Showing posts with label DIY. Show all posts

Friday, April 1, 2016

A is for Antiques, Old Stuff and stuff that just looks old


My newest oldest!

I am seriously in love with this piece.  I cleaned it up a little and beautiful! 

The pulls are amazing and the detail is charming! 


I saw a definition of Antique on Facebook the other day that said: Grandma had them, Mom sold them, I bought them back.    That pretty much explains my life in a nutshell.   My grandmother's kitchen was filled with a big old stove, a tiny refrigerator and the most amazing collection of cookie jars and cute things you have ever seen.  In that kitchen, on that big old stove, she baked some of the most amazing, love filled concoctions you could dream off and made the worst spaghetti on earth. My grandmother was Hungarian and somehow Italian food cooking was not something she could master.  It could be the tomato juice she used instead of pasta sauce.  That's just a guess.

My dream kitchen will have one of those big old stoves from the 1940's in white with red trim and if I can ever afford to replace the cookie jar my mother lost (shout out to mom who I still adore even though she lost the Little Red Riding Hood cookie jar promised to me by grandma when I was 7), that will be added someday.    I have had a love affair with history since I was a kid and today it translates into old stuff and junk.

The piece above is my latest purchase.   It is amazingly charming, old and well loved.  I have no idea how old it is exactly but what I do know about it is that it came from a friend of mine who is moving to Minnesota and that I fell in love with it the minute I saw it.  My friend said to me, "You could paint it and make it awesome."  I replied that this is not a 'paint it' piece.  This is a keep it like it is and put it somewhere to show it off piece.

I can't tell you exactly how I know not to paint this except that it is in really good condition, really pretty the way it is,  and I knew immediately that painting it would be a tragedy.
I have a love affair affair with old junk treasures.  Some of the stuff is awesome and some has potential.  Some needs to be painted and some doesn't.  My entire house is a work in progress and I am slowly filling it with well loved pieces or making stuff looked well love.

I have found pieces in the trash pile at my recreational land in East Texas.  Yes, my land has it's own trash pile.  There is no trash pickup out in the country and the people that lived there years and years ago just tossed everything in a pile. We take our trash with us when we leave but that doesn't fix the pile problem.  Truthfully, it scares me but I managed to find an amazing old bucket that I turned into a hanging planter so I got past my fear.


My kitchen is only 45 years young and at some point in the 90's someone did a remodel on it. They didn't do a really good job and the kitchen is terribly small.  When I moved in, the cabinets were all white and they looked hideous.  It wasn't a pretty white or a clean white and frankly, with no disrespect to all of you out there (and you are the majority) who love white cabinets, the artist in me is bored with white.   I kind of run to the beat of a different drum and my drum said turquoise and red 1950's style kitchen.   I distressed the cabinets and made them look old and thank heavens, my husband loves them.   Just a side note here, these cabinets are awesome.  Everyone who comes into my house just loves them.  The black isn't quite as dark in person but I am so glad I used a black glaze on them.  It has been over a year since I redid them and I am not even considering painting them which is a miracle for me. 

Do you remember these end tables your grandmother had?  These things were all the rage in the 1970's and they fit my home perfectly since it was built in 1970.   I don't do pieces from one single era because I like a lot of different things (None of which are mid-century mod)
but this was something I was determined to find and redo.   I like to think that when you save these pieces to love another lifetime, you are doing the earth a favor and yourself.  I have to apologize for this photo.  It is the best I have of them because the lighting in my living room even with every lamp turned on, is not good.   This is actually a lovely creamy mint green color paint with brown antique glaze for age.  No distressing.  (BTW, yes, I know I need a new camera.  I am using my iPhone because I lost the program for my Point and Shoot Sony and I want a 'real' camera next time but budget has to be met first!)


Lime finished Chest

This old chest of drawers, which I have featured in this blog more than once, and I never manage to feature with the actual handles that are on it, is amazing.  It was in terrible condition and had to be painted.  Unlike the buffet above, this piece needed serious TLC just to make it work.  I basically had to rebuild half the drawers.  I love how this chest turned out.   I had it for sale and nobody has ever purchased it and that is just fine by me. I realize that everyone doesn't need a high chest of drawers and the thing that is in vogue right now is the wide dressers that you can turn into media cabinets.   The thing is, this chest has character that mass produced furniture just doesn't have. It is probably 60 years old, maybe more, and when I was refinishing it, I thought about the families that used it before me.  The hopes and dreams and laughter and sadness this piece witnessed over the years.   This piece took an incredible amount of work and it doesn't photograph as well as it should but it is simply beautiful.   So pretty in fact that it is the inspiration for my guest bedroom remodel.   The queen bed that I have for the room will be finished in a antique grey and the colors for the bedroom will be white, yellow, blue, and grey.


So yes, I love antiques and old junk.  Whether you make something look old or find a new use from something that is old, there is nothing more amazing that bringing new life to something that was once well loved and should be again.


Sunday, March 13, 2016

DIY Monday: Chair redo

After and before

So it is time for another DIY Monday and this week I added a chair to the desk I redid last week.


Before

I had this chair (actually have 2) as leftovers from an old dining room table which is now my family room coffee table.   

After

Clearly my kiddo loves pink and especially any form of pink camo.  She actually has throw pillows in a similar pattern to the chair and her bed spread and shams are pink camo.  So are half her cloths so this fabric was a no brainer. 


Sexy Legs

Unlike the desk, I decided not to antique the chair.   I like that it is in the same General Finishes Antique White Milk Paint but isn't an exact match.   Obviously the chair is not a match to the desk either and sadly, doesn't fit under the desk but that's okay.   We have a plan for storing it right next to the desk. 

 All set up!
So that was my fun project this weekend.  The other project was putting in a little duck pond which required us digging a hole and then backfilling the pond area.  Our ducks are supposed to be in next week so expect some totally amazing photos of baby ducks!

Relax this Sunday morning with some great blog posts! Share your favorites with us!
Be a Warrior Queen


Monday, March 7, 2016

DIY Monday: Antique Desk Makeover, the end!

All the details on this piece gave me fits!

The end is near!

When last we saw the desk
As you may recall, my husband managed to salvage this old desk from the trash heep at a building where he was working.   

I spent a lot of time just working on the prep part of the desk.   The poor thing had 4 layers of paint and stain (at least) that I removed from all those little details and the legs, oh the legs gave me fits!

The drawers
My kiddo was very specific.   She wanted white, she didn't want it distressed but she wanted it antiqued.  The top had to be stained and I better do it right.    Normally, I don't use a gloss poly on pieces but her father requested it and I figured, what the heck.  It is pretty and I sanded the top down well so the gloss will highlight the beauty of the natural wood and stain.  
The shiny top
For this piece I used General Fiinishes Antique white Milk Paint and Java Gel stain.   Now, let me say I was shocked at how deep and dark the Java came out.  I left it on only a few minutes but the stain just penetrated the wood like water.   I told my husband I have never seen a piece of furniture that wanted to be stained more.  
For the antiquing I decided to use a silver glaze sole by Maison Blanche paint company.   When I buy paint I tend to use either General Finishes or Maison Blanche.  Now, I have some real milk paint that I am going to try on another piece so we will see how that works.   For this piece, because the kid was so clear on her wants, I decided to use something I had success with previously.
Silver antique
So I painted the body first with three coats of General Finishes Antique White.   Next came the Stain.  As you can see below the top just soaked up the Java Gel.

 
Luckily there was still grain showing through and I loved the contrast of the really dark top and the light body.  
All Done
Once the piece was done we moved it into the living room, temporarily so that we can get rid of the old computer desk.   I have some pictures on my camera that are way better and I will add them as soon as I figure out why my disk scanner on my laptop isn't working.   (It's always something!).

So to recap this project:

The desk was totally free and I am so glad my sweet hubby saved it from the dumpster and certain death!

The days/nights of stripping this thing made my time spent incredibly long but I think the finished product is simply lovely, feminine, and perfect.

The painting and staining took approximately 3 days from start to finish and included:

*3 coats of GF Milk Paint

*1 coat of Java Gel

*5 coats (with light sanding in between) of Poly Acrylic Gloss on the top.

*1 coat of satin Poly Acrylic on the base

* Antiquing with Silver Organza by Maison Blanche Paint Company

*Clear wax for protection

*Maison Blanche white Limestone Wax to soften the overall effect.

*Lots of buffing, cleaning, and bath time for me!


In between all of that I managed to help hubs repair our old shed/barn, mow an acer of lawn, plant the first round of our garden which included Turnips, Cucumbers, Zucchini, Yellow Squash, radishes, Cantaloupe, Blue Berries, Raspberries, and Grapes, and also some flowers (Which my chickens were eating the tops off!).   Just an average weekend when we are home.  There is no rest for the wicked.

Happy Monday everyone.  It's spring break this week and we are doing lots of fun stuff like dentist appointments. 


Part 1 of the Desk Makeover


Friday, March 4, 2016

Changes, rebirth, and retooling


A lot is going on in my life right now, not the least of which is that I am working on retooling this blog and simplifying my message and find a clear direction.   My platform may change, I haven't decided yet.  I am working on a redesign, something I have never been completely satisfied with, through the years.  I want to make navigation easier as well.  I am also intent on improving my picture quality. I am going to invest in a great camera soon but until that happens, I will be using my digital camera starting Monday.  It is a point and shoot so don't get too excited. 

 I also have my personal laptop fixed and ready to go.  Up until now, I have posted mostly from my phone.  Getting my laptop clean took several days at Geek Squad since, even though I don't use it, the thing had almost 3000 different malware and virus' on it.   How does that happen when it is never hooked up to the internet anyway?  (Yes, I had virus protection it and it didn't work, so I changed to a new program.)   With that in mind, I ask that you stick with me a little longer and I will have a great new layout and plan ready soon.    I am putting an extra lot of thought into this so that I finally get it right.   

In the meantime, I thought I would share with you a little bit about what I have been working on the last few weeks that I haven't blogged.   First is the desk from hell.   I have never worked so hard at prepping a piece of furniture in my life.   That includes the antique dresser I had to basically rebuild drawers on last summer.   This piece will finally be ready for refinishing this weekend and there is a chair that I am going to paint to match and recover with fabric for my almost teen.   I can't wait to share with you the finished piece.   

I have been sick for the last two weeks and been on antibiotics and steroids.  In fact, 2 weeks ago, I was in the ER trying to get better. It hasn't worked.  This delayed my work on the desk more than once not to mention that I was too sick to work on the blog.  I apologize to everyone who missed me.  Did anyone miss me?


My chickens are going to be a big part of the remodeled blog.  I wanted to share this picture I took last night.  This is what happens every single time I walk out the door.   They come running up to me in anticipation.   Yesterday morning I gave them some grapes and if you have never seen chickens with grapes, well just suffice it to say, chicken football is better than the puppy bowl! 


I have also been working on the yard and spring is finally showing it's beautiful face in North Texas.  Finding plants my chickens won't eat is a challenge.   Luckily, I have managed to salvage a few from their hungry little beaks.  

Last year we planted fruit trees in the front and back.  The peach, pear, and plum trees are in bloom and while they won't bear any fruit for another year or two, they are making the yard simply beautiful.


I love just looking at the blossoms and enjoying the beauty of nature.   Finding happiness in the simple things in life is my major goal right now and a big part of my future.  (Hint, hing!) 

My bulbs are starting to bloom as well.   I can't take all the credit for the plants in my front yard as the previous owner did a really good job starting the yard off.  I am adding roses and more chicken friendly bulbs and plants.   This is a huge challenge and something I will share more about in future blogs.  

I am also in the process of removing a lot of weed barrier in the front flower beds.   The weed barrier probably seemed like a good idea to the previous owner but two things about it make them have to go.

First and most importantly is that it does nothing to stop the weeds from growing.  In fact, last year I spent a good amount of time trying to kill the weeds that simply planted themselves on top of the weed barrier and grew down.    Second and almost as irritating is that I can't plant more flowers without cutting through the stuff.   I know you can't tell in the picture above, but this flower bed is huge and while there are lovely plants already in the garden, I am in the process of adding to them to make a more English garden feel.  I will be posting some better photos when I get this thing worked out.   The garden has a good start but there are too many empty spaces.   The flowers above are something I planted last weekend and I was thrilled to see they are already starting to bloom.   I also planted some lily bulbs.   I am hoping they take because halfway through I realized I planted them upside down.  Bulbs are new to me.  I planted only tulips in the past, my favorite flower.   The problem with tulips in North Texas is that you don't get a cold enough winter for long enough to actually grow them without giving them an artificial winter.   As much as I want to plant a ton of tulips in my flower beds, I also realize that I have no desire to dig them up every fall and put them in the fridge for weeks on end.  

For Valentines Day my husband bought me rose bushes.   I laughed that, with him love comes with work, but instead of getting roses for a few days, I will have them for the rest of my life.  You can see just one of the 5 bushes I planted a few weeks ago.  

I am excited for spring and the rebirth of nature.   I have come to realize with everything going on in my work life lately (more on that some other time, it is depressing), that finding your happiness is about the place you feel most at home.   For me, it is my old, sprawling, 1970 ranch house in the country with a yard full of chickens and dogs and flowers surrounding me.  Peace comes with finding shelter from the storm that brews from things you can't control.   There are a lot of things that I can't control and a few things that I can.  Staying positive is my main priority right now.  Being surrounded by so much beauty in my home centers me.

So where is your happy place?   Where do you escape to when life throws you curve ball after curve ball?   Do you have any 'favorite' things I blog about?  What would you like to read more about?  Chickens, DIY, Crafts, recipes, gardening, being a step parent?   Give me a shout out and tell me what you are most interested in.


Wednesday, February 17, 2016

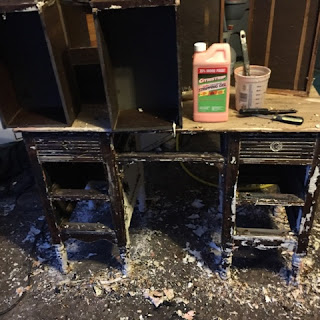
DIY: Antique Desk Makeover Part 1:Stripping

Original all the detail is hidden under layers of dirt and paint!
I don't usually do 2 part DIY blogs but this desk is a beast.  What I know about this piece is minimal as in my husband salvaged this from the trash heap somewhere he was working.  The owner gladly told him to take it off his hands and my husband, knowing me, gladly presented me with my free gift which my kid immediately claimed for her room, upon me agreeing to refinish it for her.   There went my profit but some things, money just can't buy, like a kid's smile. 

I should have taken a picture of the top which was stained with ring marks, scratches and just general abuse.   Additionally there were stickers and tape all over the piece.

Top sanded and Paint stripper applied

I don't usually use paint stripper but a few things occurred to me when we started sanding the top of this piece.   First, I don't know what type of paint they used on this puppy.  It is old, so it wasn't completely impossible that sanding it was causing me to breath in lead paint.  YUCK!   Next, it became clear this piece was painted and painted and painted.   When you are working on something old and you don't know exactly what kind of paint you are dealing with, it is probably better to be safe than sorry and use stripper to remove the majority of the finish first.  Breathing in lead paint is a no-no.  Not to mention we went through a belt sander pad and 2 orbital sander pads just on the top. To put that in perspective, I have sanded an entire dining table with one orbital sander pad and not even retired the thing after.  My belt sander has had one pad change since I bought it.  We put a brand new one on for this piece and my husband used it on part of the top and it shredded the sanding belt.  

This desk is just mean!  So mean, in fact, I started to worry about what I would find when I got through the top.  Was it wood or some 70's reproduction of an antique desk in laminate that I was wasting my time on?  Was it possessed?  Was this desk actually tossed out because it was evil?  When I put this in the kid's room, was blood going to start dripping from the ceiling and strange eyes stare back from the windows. Was she going to be encouraged by the desk to murder her father and myself in the middle of the night?   I may or may not have thought of these things as I worked on it.  I also may need to stop watching horror films and Forensic Files. (Shout out to Mili-Wife: if this happens, sell the story to Lifetime.  It will make the best darn movie they have made in a LONG time!) 


Citristrip and elbow grease 
As I began removing paint,  I could distinctly detect at least 4 layers of finish slapped one on top of the other on top of the other which were not only making paint removal miserable but hiding the detail on the piece. White, a yellowish white, black, and the original stain. That doesn't even include the spider eggs and all the dirt and grime and webs I removed with my hands because there is no pride and no fear in refinishing furniture people! The stripper has done a wonderful job of removing a vast majority of the paint and once it is off, the smooth finish sides and drawers are easy to sand down and ready for a new finish but the detail parts are taking a lot of time and love to clean out.  In fact, I worked on this for a couple hours last night after work and managed to get the drawers and detail on top of the desk all clean and pretty but the legs are still a work in progress and I am quickly realizing I need some new sand paper to finish them.   So, tonight there is a Walmart trip in the plans and some additional work to be done.  

A few things to know when you use paint stripper:

*It is incredibly messy-see all the paint chips on our garage carpet?  Yes, I should have put plastic down, silly me. 
*Use gloves:  I am terrible at this and always end up with stains and paint all over me but this stuff is toxic, I mean it removes paint for heaven;s sake, so use gloves unless you are just incredibly careful.
*Let it sit....and sit...and sit.   The longer, the better, up to 24 hours.   The longer you let it sit, the easier it peals off.  Even if you don't get it all removed and it dries, the stripper has cracked the paint and made it much easier to remove.  I used a putty knife and just peeled the stuff right off.  
*Don't give up.   Keep the big picture in mind.  When I get frustrated with this project, I remind myself of the vision I have for this piece and that, if not for the quick thinking of my husband, this charming old desk was headed for the landfill.   It is soon to grace my kids room and with the help of an old chair from my dinning room and some new fabric for the cushion, she is going to have a nice place to do her homework.   All this work will pay off.  Unless, of course, it is possessed, in which case, well this will just suck. 


Note: The last picture isn't what it looks like now, but you are going to have to wait until part 2 for the rest. 

Monday, February 1, 2016

From beat to neat: Sofa Table makeover

Before and After 
I got this table last summer and it sat in my office for months and months because I didn't have room for it in the garage or time to refinish it.   I knew in principal what I was going to do with it and I knew that I wanted to use it for the TV.


Beat UP!
As you can see, I got it home last week and the top needed some special attention.  I have never had a piece that was so beat up on the surface.  Because it was going next to the buffet I refinished last weekend, I decided to make them match.  Obviously these pieces are different but I wanted them to coordinate.


Top all Sanded.  Don't you love the 1970's flower detail on the drawers?  
So I sanded the top with the idea of staining it with General Finishes Java Gel which I had used on the top of the buffet.  As you can see above, it sanded beautifully but I wasn't aware of how dry the wood was.  If I had been, I probably would have oiled it first so the stain didn't dry out as fast as it ended up doing on me.  Next up I removed the knobs which got a little brown spray paint treatment and then a removal of paint to make them look antique gold.   Next the base was lightly sanded with some fine grit sand paper.

I hate painting spindles! 
Then I started painting the base.  I hate painting spindles and had to do this super carefully, making sure to catch any drips and fix them before they dried.    This is finished in the same General Finishes Milk Paint, Linen, that I did the base of the buffet in last weekend.   I love this color but what I discovered about it is that I am so pleased with the way it looks without antiquing that I decided early on that this piece would not be distressed.   That is a departure from my norm because I love the distressed look of pieces normally.  This piece has some natural distressing due to the age of the piece and I decided to work with that only.

Halfway HOME!
Once I got the base coated in three good coats of the Linen paint I sanded it slightly to remove any imperfections and added a final light coat of paint and let it completely dry. I was ready to move on to the top.   I have learned something about myself this weekend, I am incredibly picky about my finish on pieces.  I don't like to see any drips in my paint and I am a stickler for no brush marks.  I noticed this when I was looking at on line garage sales and examining the work of other painters.   I told my husband, it drives me crazy when someone spends so much energy repainting something and I can see in the photos the brush marks, splotches where paint is inconsistent, and places where the finish just doesn't look smooth.   I am picky.  I would end up redoing all the finished pieces I saw.   This is why I do my own work, more than any other reason.  I would rather customize my home and know the pieces will last.

Supervisors always looking on.
Meanwhile, one of my hens decided to come supervise my work.  First she checked out the sleigh bed I picked up this weekend.   This piece is going to eventually end up in our spare bedroom as our guest bed, once I refinish it.  It was a steal of a bargain of $0.00 because a friend called and said if I didn't come get it she was putting it in the trash.   Hold up, wait!  WHAT?   FREE is my price of preference.   The side rail needs a little work but nothing I can't fix with some L brackets.  I was all like 'sign me up for free'.   So I ran out to get this Saturday and put it in the garage.

Someone wants to ride
Henrietta above, decided she needed to get some bike riding in and jumped up on the bike to go for a ride.


Or read??
Once she got up there however, she noticed the books and decided a 70 degree Saturday was much more of a reading day.   I finally had to grab her and remove her to the backyard so I could get some work done without worrying about her getting into trouble.

Top soaked up the stain! 
Back to work I went staining the top.   I only put one coat of Java on the top and by the time I had gotten to the end of the line, I noticed the stain had soaked right in to the wood like water.  This is gel stain and it is not suppose to do that, see what I mean about the wood being dry.  I am sure now that it was because the top was so scratched that the wood had simply no conditioner left to prevent this from happening.  Then I debated with myself, what to do, leave it super dark or sand it down, condition it, and redo the entire top.

Read for the sealers
I decided to leave it super dark and proceeded sealing the top with several coats of General Finishes High Performance top coat.  Once I got a good protective layer or 10 on the top this baby and I coated the base with or two coats (I can't recall) of the same satin finish then  I moved the piece inside.


Wax and then done
It dried and dried and dried.   I like how it looks with the buffet.   I was pleased.

Finished for now
So this morning I woke up, waxed the entire piece with clear wax, buffed it out and moved the TV on top.   The piece is finished for now.  I am going to add a shelf to the bottom to hold all the components for the TV.   However, for now, because we aren't in the market for a larger TV yet, I left the old crappy stand behind it and just covered it up so it didn't look so stupid.

Here is my main problem with this room, the room is long, super duper long, actually.   I have a 48 inch TV and when you sit on the sofa, it looks like a 26 inch TV.  No joke!    So when we get around to buying a giant TV, we will be able to move the TV back against the wall.   Yes, I would love to put the TV on the wall but unfortunately, this is not going to happen.   See, in this room, the wall the TV is on happens to be the same wall there is an ugly breaker box.   Why they didn't remove the breaker box to the new garage when they converted the old garage is beyond my comprehension.   I am a slave to someone else's home improvement laziness here folk.   Maybe at some point we can move the box and I won't have this struggle.  Until that time, the struggle is real.  

So, what do you think?   Table and buffet look awesome together don't they?   Who would ever imagine these pieces started out so incredibly ugly?

Below are links for Amazon where you can find the paint I used on these pieces.  Amazon affiliate links don't cost you anything additional if you purchase from them.  FYI. 


Tuesday, January 26, 2016

Buying and Selling: DIY fanaticism

Goodbye sweet Dry Sink. Pictures don't do it justice. 

I had my first official sale last night and it was to the nicest man.  He actually has a resale shop but fell in love with my dry sink (above) and wants it for his own place.  We talked for quite a while about painting and redoing furniture and he wants me to school him in the finer points of furniture refinishing.  He said my stuff is so much better than the stuff he has seen on the market that he wants to pick my brain. :)

I can't describe how wonderful it feels to have someone appreciate what you love doing.  I would love to do it full time someday but that's probably a pipe dream.  In the meantime, I love that something I made beautiful has found a home where it can be appreciated!  

Okay, here is a sneak peak at one of my next projects.   This is a table that has been sitting in my office at work.  I am refinishing this for my house.  
Project 1: my new TV stand. 
It will be my new TV stand.  I am going to paint it the same colors as I did the buffet that holds my DVD's.  General Finishes Linen Milk Paint on the legs and Java Gel stain on the top.   I have fallen in love with General Finishes Milk Paint.  This stuff goes on so smooth and it doesn't require a ton of sanding, the way chalk paint can.  No brush strokes! 

Very happy to see the beautiful wood grain. 

And I am about to start working on this as well.  This will be for the kiddo's room.  The body will be General Finishes antique white milk paint (her choice) and the top will be their java gel stain.
I am so excited to get my hands on this.  

In the meantime we found out today that we are going to be on the Tour De Coop this year.  On April 30th people will be coming to our backyard to check out our Chickens and the coop area.  I am so excited.  We don't have that Pinterest fancy coop happening so I wasn't sure we are fancy enough.   I love my chickens though and don't mind at all sharing the love with others.   Expect more on this sometime around 4/30! 

Happy Terrific Tuesday folks.   Do you refinish old furniture or love chickens too?  If so send me a shout out!


Popular Posts